DEVLOG SEPTEMBER ’23
Lots of stuff getting released this month!
METEOR
I proudly present Marty’s Extra Effects for ReShade (METEOR), available on GitHub here. Whereas iMMERSE is designed to cover the main ReShade uses cases with severely overengineered solutions, METEOR contains more specialized effects that didn’t make the cut for iMMERSE but are still highly useful in their own right.
LOCAL LAPLACIAN
METEOR Local Laplacian is the first real-time implementation of the Fast Local Laplacian Filter [Aubry14], state of the art for local contrast enhancement. Local Laplacian is the powerhouse behind Adobe Lightroom’s Clarity/Texture/Dehaze features. It enhances image texture contrast significantly without any halo or “HDR” glow.
The reason why the Local Laplacian is a major novelty for post processing effects is the performance cost. The original Local Laplacian Filter [Paris et al. 2011] takes minutes for a single image, whereas FLL is about 50 times quicker. However, this is still not real-time, taking 116ms for 4 Megapixels on a GTX 480. For reference, iMMERSE Pro Clarity takes 0.2ms for 5 Megapixels on more recent hardware. METEOR Local Laplacian runs at about 1ms on a RTX 4090, which is about 10x-20x faster than the original FLL when taking the differences in hardware into account.
This algorithm surpasses iMMERSE Pro Clarity, which was designed to mimic Local Laplacian contrast without the high computational demand. This release provides the foundational shader I initially developed in order to make iMMERSE Pro Clarity in the first place.
FILM GRAIN
The most accurate high-performance film grain shader available anywhere. While most film grain effects available more or less blend some perlin noise into the image with varying results or leverage film scans, this one dives deeper. METEOR Film Grain is the most advanced film grain effect available for ReShade to date.
If you are interested in the mechanics of this filter and the science that went into it, read ahead:
How does analog film work?
Analog film contains tiny silver halide crystals, which turn into metallic silver when exposed to light and immersed in specific chemicals. As metallic silver is really dark, the areas that received lots of light turn black, giving the image an inverted look. That is where the term “film negative” comes from. Here’s how these crystals look like:
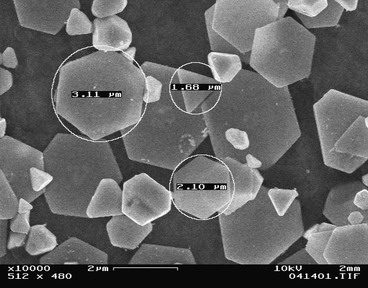
Under a microscope, developed film shows tiny white dots on a black background; each dot represents an exposed halide crystal surrounded by a dye cloud (a “grain”). The image brightness corresponds to the density of these dots.
Despite uniform light exposure, the inconsistent crystal density and randomness of photon activation cause a grainy look, known as film grain.
Turning digital
When using digital displays for viewing, analog pictures are eventually scanned into digital images. As scanners gauge the brightness, each pixel reflects the average brightness of its corresponding film area. Thus, the varied density of white dots against black translates to shades of grey pixels.
Simulating it, the easy way
As mentioned, the varied density of activated crystals and dye clouds translates to pixel noise. A common method to replicate this is by adding random noise to each pixel in a digital image. Many ReShade effects and shaders simulating film grain in games use this approach.
Simulating it, the hard way
Upon closer examination, this method is relatively imprecise. Various algorithms aim to create more accurate noise profiles mimicking film grain, use scans from actual film, or, most intricately, simulate each single grain on analog film, as seen in Newson2017 and recently in Zhang2023. However, these often produce a per-pixel noise model ignoring grains that overlap pixel boundaries or are too slow (e.g., Newson2017 can take hours for a single image).
Let’s look at how Newson2017 did it. Just looking at the pretty pictures in the paper.
- Simulate multiple grains with varying sizes and positions within a single pixel
- Each of these grains can potentially overlap with neighbouring pixels and thus a single activated grain/crystal can affect multiple pixels. So they generate full size images for each single grain
- The final image is the average of all these images
Let that sink in. One fullres picture for each. single. grain. Multiple grains per pixel, millions of pixels on the source image. The amount of data involved is mind boggling.
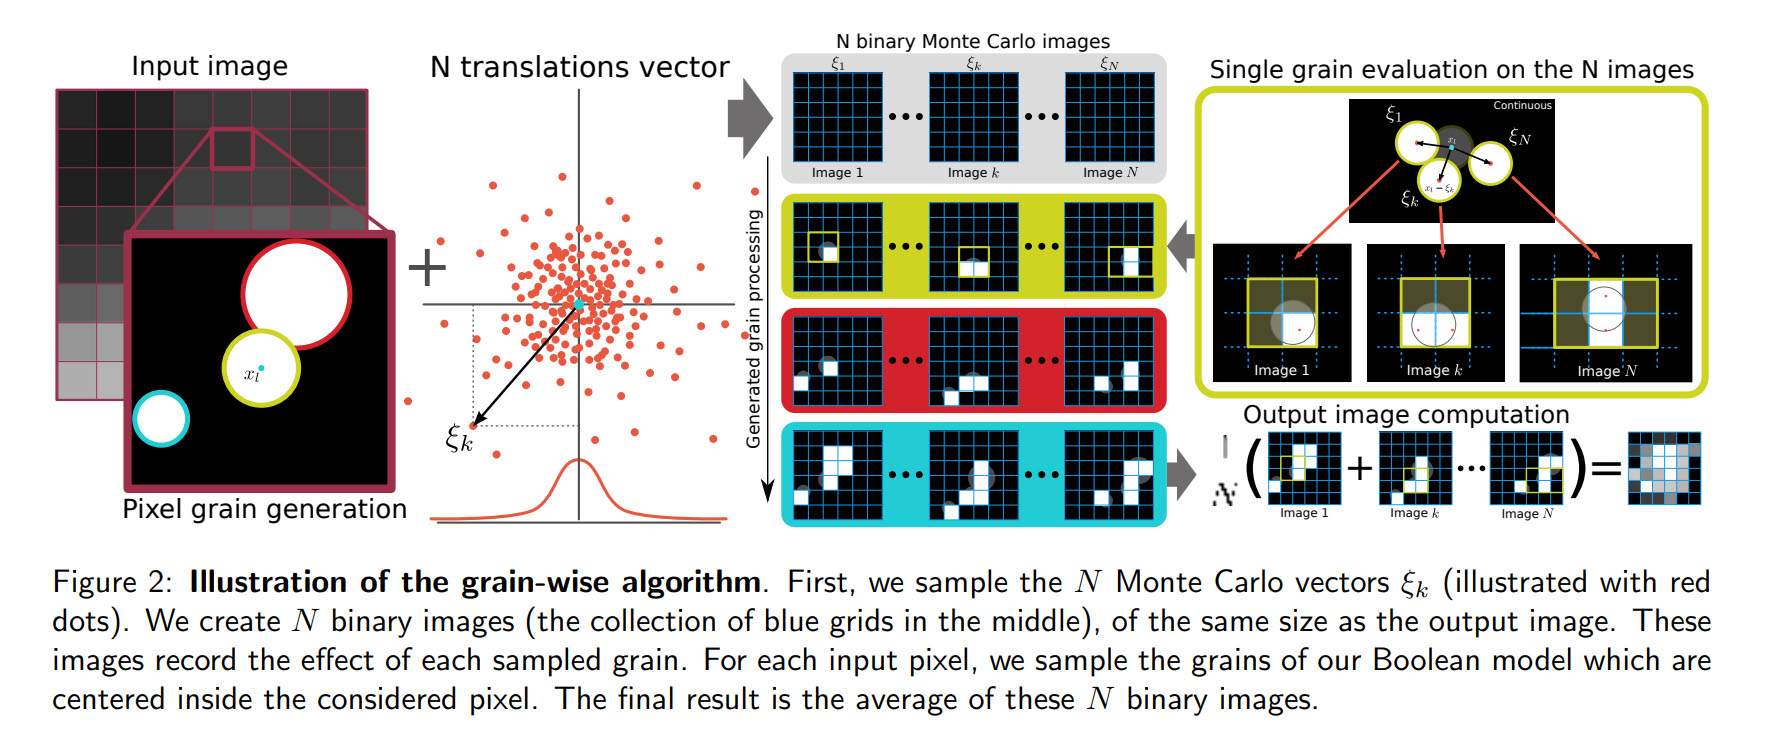
Now, to do this, all you need is 35GB of VRAM for each point to store, combined with multiple megabytes for each image spawned off each crystal. That lands us square in the super computer range. They do amend a pixel-wise algorithm that simplifies this approach but it’s still severely slow and impossible to use for our purposes.
And I wanted to cram this concept into realtime.
Welcome to jackass.
Simulating it, the clever way
Instead of Newson2017’s approach where each pixel can spawn dislocated grains virtually anywhere, what if we assume grain centers are confined within the pixel’s boundaries? This seems like a sensible assumption.
Considering grain size, dye clouds (or grains) range from 10-25 micrometers. Given that typical analog film is 35mm wide, the grain’s diameter is roughly 1000-4000 times smaller than the film. Standard screens have a similar pixel count, implying that a grain is approximately the size of a pixel, give or take.
By capping the grain’s diameter to the size of a pixel and ensuring its center stays within the source pixel, we can deduce that it might extend at most 50% into an adjacent pixel. Consequently, any grain originating from a central pixel can impact, at most, its immediate 3×3 neighbourhood.
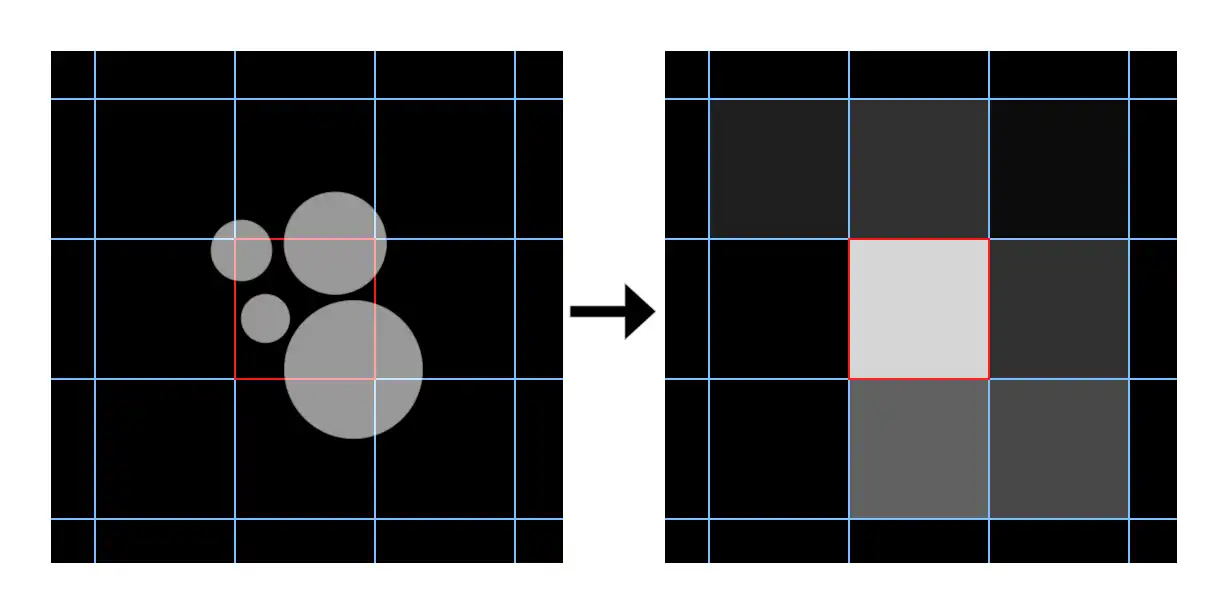
With this assumption, we infer that a pixel of a certain brightness influences the 3×3 area around it with its unique configuration of grain density, location, and number. This number is contingent on the pixel’s initial brightness, brighter pixels meaning more activated grains.
Using the original brightness of a digitally produced pixel, we can infer how an analog image exposed to the same light intensity might appear. Each photon striking our pixel could activate a grain within.
My initial approach was a compute shader that did precisely this: generate grains for each pixel, determine overlaps with adjacent pixels, and accumulate their effects for the final image. While more challenging than anticipated, the outcome was praised as “spot on” by analog film experts, proving I was on the right path. However, with a ~2ms speed (on an RTX 4090), it was much faster than the models I was emulating, yet still not efficient enough for widespread use.
I then considered precomputing results to make it compatible with pixel shaders, catering to DirectX 9 requirements. Given that the original pixel color, ranging between 0-255, is the only influencer on the grains, I had to compute grain combinations for each of these 256 possible levels. After experimenting, I settled on 512 combos per pixel level. The initial algorithm functioned as follows:
- For every pixel brightness from 0 to 255, produce 512 grain variations, calculating their impact on a 3×3 pixel area. Each area’s values were encoded into a 32-bit integer and stored in a 256×512 texture.
- For every onscreen pixel, retrieve its brightness value, randomly select one of the 512 3×3 areas, and center it on the pixel.
- The final image is the cumulative total of these areas.
This brought performance to 0.4ms. But I wanted more, and so far I followed the original approach and just optimized the way to get there with 0 visual tradeoff. The most time-consuming aspect wasn’t creating the 3×3 patches but sampling them. I had to rethink the strategy.
Simulating it, the approximated way
Understanding that grain overlap with neighboring pixels caused each input pixel to affect its neighbors, I recognized it as a type of blurring. For infinite grains, this spillover averages out. In reality, with a finite grain count, it’s unpredictable how neighboring pixels will influence each other.
Here’s the finalized approach:
- Simulate 512 grain variants for each of the 256 brightness levels. Instead of accounting for overlaps with neighbors, concentrate all their effects on the central pixel.
- Each pixel randomly chooses one of the variants and applies it.
- To reincorporate the grain spillover, I crafted a random-based Gaussian blur. It exchanges a random energy amount with neighboring pixels, becoming more like a standard Gaussian blur as more grains are used (since increased grain count results in reduced randomness in overlaps and a generally clearer image).
This method has been meticulously benchmarked and produces results visually on par with both the initial exhaustive method and the patch-based version. It operates at a swift 0.15ms in my tests and offers convincingly realistic outcomes. It’s also adaptable to RGB. Instead of referencing pixel luminance, the process is executed individually for each color channel.
For the few who’ve followed along till this point, I hope you recognize the intricate effort behind my simple film grain shader. One can only imagine the extensive (and perhaps over) engineering that goes into creations like RTGI.
Chromatic Aberration
METEOR Chromatic Aberration is an enhanced re-release of Yet Another Chromatic Aberration (YACA), a highly detailed chromatic aberration effect. Chromatic aberration refers to the color displacement seen in screen corners, a result of light refracting differently based on its wavelength.
In an ideal world, a lens would have a consistent focal length for all light wavelengths. However, in reality, a lens refracts light variedly based on its wavelength and thus, color.

All my homies hate chromatic aberration!
Every graphics guide for video games ever tells you to disable chromatic aberration. How stupid are game devs, adding this effect when all the cameras, post processing software etc. work hard on removing it from real captured material! And it looks ugly as well! Game devs counter with the argument that digitally created images look “too” clean and reintroducing some of the artifacts of real cameras helps selling it.
I agree with both sides and boldly claim that everyone does it wrong, that’s why you hate it.
Everyone does it wrong? And you don’t? Suuuure!
First, I agree that chromatic aberration is mostly overdone in video games and I think that’s because the effect costs performance. And with a given frame budget, if we have to pay performance for an effect, we better make it visible. So artist X or exec Y tells the team to “crank it up”. And that’s how you get an image with more rainbows than a pride parade.
But let’s look at all the ways I identified that games do it wrong:
- CA is usually done modelled after the wavelength spectrum of light or a RGB shift approximating said spectrum. This is the type of chromatic aberration created by a single lens element. But we want to emulate film cameras and real camera lenses, right? And what NEVER contains a single lens element? A camera lens.
A so-called Achromat focuses 2 wavelengths at once, an Apochromat can do 3 at once. Super Achromats can do even more, each time reducing the overall chroma shift for the wavelengths in between. This results in different spectra. For an Achromat, think of the left half of the regular rainbow spectrum folded over, resulting in a green-magenta CA. - CA is usually applied as a post-process. This is again wrong. It happens even before light hits the sensor or film. So it needs to happen very early in the rendering process, before converting colors to the dynamic range of the monitor and so on.
Performing chromatic aberration in HDR makes the chroma shifts more prominent at high contrast edges, thus we are able to limit the total range and reduce the amount of perceived blur, the main criticism people have with chromatic aberration – it makes the image blurry. If you do it right, it won’t.
Going further, the more complex algorithms such as Prism.fx for ReShade overlap the radial blur with a numerical fit of the colors of each wavelength. To avoid a color cast, they divide each channel by its contribution to ensure the colors sum up to white. This however falsifies the spectrum and messes up the colors.
Below you can see a white blob being blurred by a chromatic aberration filter using the highly accurate Zucconi6 fit. The gradient looks nice, but applying this on a regular image would cause a color cast. Normalizing to make the entire gradient sum up to white ruins it:
The correct method is to modulate the intensity of light in each wavelength, such that if there is too much red in the mix, make all the parts of the spectrum darker where the amount of red is higher than the others. This was actually really complicated to achieve and I had to design a gradient descent algorithm to produce a good result.
After solving all the problems one after another, the end result is the only chromatic aberration shader that I know of that can both do chromatic, achromatic and apochromatic aberration, produces a correct gradient and performs the entire math in HDR color range.
TODDYHANCER
You are still with me? Cool, so here’s the third spotlight of METEOR. A few years ago, a mod made waves that was called the “Toddyhancer” by modder Martin Bergman, even catching NVIDIA’s attention. Al lot of gaming magazines reported on it, and information about it was pretty vague, mentioning at some point it’s a “ReShade inject”. As it never got released, people eventually forgot about it.
Now – I managed to get my hands on the files and… it’s a SweetFX preset. I personally don’t like it at all but people went mad over the pictures back in the day so I kitbashed the involved SweetFX shaders together with their configuration values as the preset is not reproducible any more since the SweetFX shaders received several changes since then.
So, for your consideration, the original Toddyhancer now available as a single ReShade effect.
Enhanced IGCS Depth of Field
Lastly, I spent some time this month improving the great IGCS Connector by respected modder Frans Bouma.
The IGCS Connector is a ReShade Addon that interfaces with Frans’ proprietary camera tools and extends their feature set. His camera tools allow many of the shots in our gallery to happen, by giving control over the game’s camera position and adding features such as pausing the game in the middle of a scene and more.
The IGCS Depth of Field is a shader that stacks many frames from slightly varying camera origin points (done via the camera tools) to render a single image with perfect Depth of Field. This method produces far superior DOF than any post process shader can, but can only produce a single still image at a time, requiring anything between 30 seconds and 30 minutes for a shot.
Yes, screenarchers are dedicated.
I’ve improved the color rendering for bokeh highlights, mitigated moiré, implemented a physically accurate spherical aberration mode, future proofed the shape generation to support textured RGB weights for each sample and fixed a couple of bugs. Frans merged my changes a few days ago so if you happen to use this tool, check out the newest changes!